Can you take professional photos with iPhone?
The short answer is absolutely yes. The long answer is much more complicated. While you can take professional photos with an iPhone, it does have limitations. Those little pocket marvels take some amazing photographs, but like all cameras (including DSLR’s) iPhones cameras can only do so much and to get the most from them there are some best practices. If you are wanting to take better iPhone photos or get professional quality photos, there are a few tips you can incorporate to get great pictures.

Use the iPhone Camera App or Use a Third Party App
One of the biggest recommendations that you will get to getting the best photos from your iPhone camera will be to use an app and ditch the default iPhone Camera app. While I will admit that the iPhone camera app is not a jack of all trades, for most people they will be better suited to sticking with the included default camera app. Professional photographers and pro users will get some added benefit from having the deep control afforded with the use of other camera apps. There are certainly uses and compelling reasons to use a third party app. However, most people just want to take good quality photos without the fuss. That is my goal. I want you to be comfortable using your iPhone camera app to get the best images you can.
Clean Your Lens
This is my #1 recommendation of all iPhone photography tips. You can know all the technical settings, have eye catching compositions, and be the world’s best photographer. But if your lens is dirty, you won’t get a good photo. It seems so basic. And it is.
Our phones are constantly handled by us. We are touching it to send text messages, make phone calls, check social media or email. Even just innocently pulling your iPhone out of your pocket, can cause your hands to somehow touch the camera lenses. We don’t think about it until we try taking a photo and it just looks off no matter what we try.
When I am taking photos with my iPhone and I am not happy with the outcome, I always start with wiping my lens. It is the very first place to start to taking better iPhone photos. I almost always just use the softest piece of clothing that I am wearing to wipe my lens. I haven’t had a problem scratching my lenses. You could buy a small pocket lens cloth if you are concerned. Within the past two years, I have been putting lens covers over my iPhone lenses. So if I scratch one of my lenses, I can easily replace the cover.
Turn on the Grid Lines
Grid lines help you line up your photo ensuring that your angles are straight and can also help you with composition and overall photo balance. You can turn on the grid lines by going to settings –> Camera –> Look Down the page under the heading “Composition” for “Grid”. Toggle the grid switch to turn it on. It will turn green when it is active.
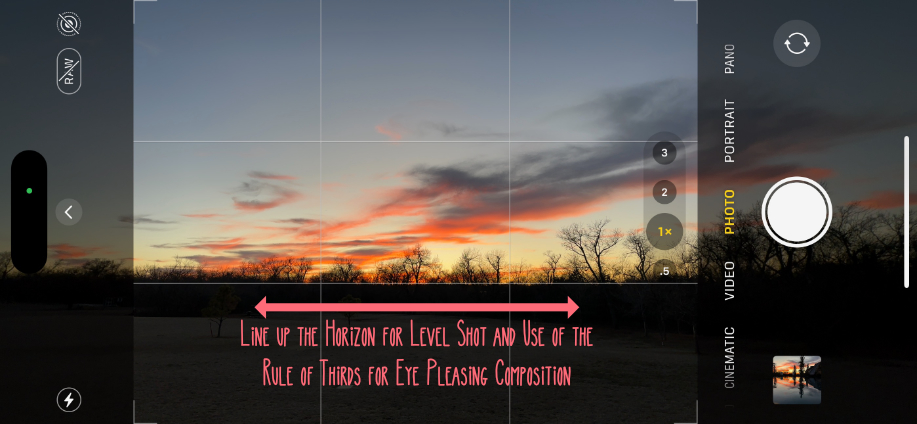
One way to use the grid, is to line up the horizon. A simple landscape photography fix is simply getting the horizon perfectly straight. This is especially true on horizons that are known to be flat such as ocean photos, really any water, big open fields, or photos from an airplane.
Another use of the grid is to ensure all of your photo angles are perfect. If you are photographing a building. Line up the walls with the lines on the grid. Or look for perspectives that are off. Sometimes you can take a few steps left or right and get all the lines to be perfect. If you are taking a balanced photo, it is easy to make sure the spacing is perfect before tapping the shutter button.
And last, use the grid for composition. You can use the power of the rule of thirds by utilizing the grid that already has the thirds marked right on your screen as you take photos. You can line up and balance any leading lines.
Hold Your Phone Still as Your Take Photos
This is another often overlooked yet super simple of all iphone photography tips. Simply hold your phone still. You want to avoid camera shake. Your iPhone is designed to overcome this as much as possible. But if you can hold it perfectly still, you will take better iPhone photos.
Most of the newer iPhones have tried to help overcome a shaky camera by including some sort of stability rather it is software driven or hardware driven. It does have limitations. And anything we can do to stop camera shake will improve our overall picture quality.
The easiest way to hold your phone still is to use a tripod. I carry one with me on all of my travels and will often have one on me throughout the day. But it isn’t always feasible to carry one with you. In this case, do the best you can. Prop up your phone against something. Use the flat edge of your phone to allow it to sit on a smooth surface. And if you are shooting handheld like most of us do for the majority of our photos, use both hands and stand with balance to steady your shot.
Tap to Select the Precise Focus point
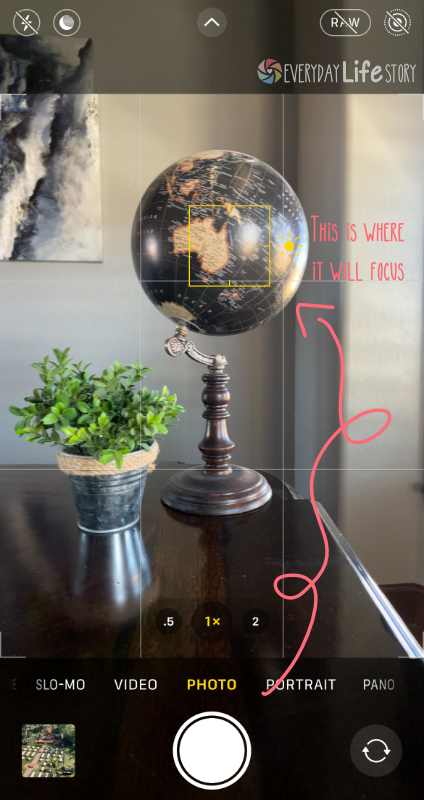
Your phone’s camera app will continuously adjust your camera settings for what is on your screen which is what is in your photo. Most of the time, it is spot on and you don’t need to make adjustments. If there is one particular item, thing, person, location, etc. that you want to make sure is in focus, all you have to do is tap the screen right where you want the camera to focus. And then take the photo.
Drag up or Down to Select the Exposure
If you are having trouble getting the lighting correct, use the exposure settings in the iPhone camera app to dial in the perfect exposure. I caution over use of this one as Apple has really done a good job with its camera processing. Automatically in the background, your camera is taking multiple shots with multiple exposures and just seamlessly stitches them together to produce a pretty good exposed picture. However as all things automated, it has limitations.
If you need to adjust the exposure, iPhones make it so easy. Tap on the focus point. A yellow box will appear around the area of focus on your camera screen. Look to the right of the yellow box. You will see a sun icon. Use your finger to drag up on the sun to increase the exposure or brighten the subject. Or use your finger to drag down on the sun icon to decrease the exposure or darken the subject.
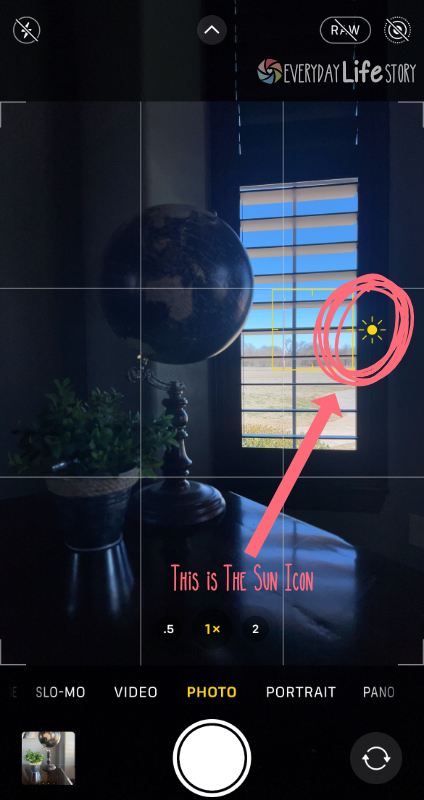
Be very careful when using this setting. Most beginners tend of over expose or under expose their photos. This setting is only used if you iPhone is not automatically getting the proper exposure. I use this when I am taking landscape photos and the sky is so over exposed it is white. I caution over use of this one as Apple has really done a good job with its camera processing. Automatically in the background, your camera is taking multiple shots with multiple exposures and just seamlessly stitches them together to produce a pretty good exposed picture. However as all things automated, it has limitations.
Do Not Zoom by Pinching Your Fingers
There are two types of zoom: optical zoom and digital zoom. Optical zoom uses your camera lenses to make your subject bigger or make it look like you moved closer. Or conversely, it uses the lens to make your subject small or make it look like you moved back. This is good zoom. Digital zoom will also zoom in, but it does it with software. This is the bad zoom. When you zoom with your fingers, more often than not, you are triggering digital zoom.
Why is Digital Zoom Bad?
Ok, so it isn’t bad exactly. At the most basic explanation, digital zoom basically just crops your image. It doesn’t add pixels or more detail. It is almost the same if you took a regular picture and cropped it yourself. Your lens can only collect so much data and details. So, when you zoom in digitally, the photo gets poor. So, it isn’t wrong to use digital zoom. It just will not get the best photos from your camera. And not having massive amounts of zoom is the price we pay for the convenience of having a phone camera.
Do Use all the Lenses Your iPhone Has
Although zooming with your fingers is not a good idea, go ahead and use all the different lenses on your iPhone. Switching between the wide, ultra wide, and telephoto lens is using optical zoom which is a great way to get quality iPhone pictures. When you are taking pictures, I suggest trying all three lenses. However, if you are shooting in low light, you may want to stick with the main lens which is referred to as the wide lens. It has the best performance in low light conditions.
Conclusion
Taking photos with our iPhones has become almost too easy. My youngest son was taking photos as a 2 and 3 year old. It isn’t hard to take iPhone photos. Most of us want great photos from our devices. You can get better pictures with the iPhone’s camera with these few tweaks. Begin to master these 7 iPhone photography tips and your iPhone’s camera. If you want to learn a quick and easy way to edit your photos on your camera roll, I have a quick and easy iPhone edit that anyone can do.
